Home/
Research/
  News     Docs     Download     Mailing List     SVN  

Gamma Correction
Using Gamma Correction in Anti-Aliasing

Anti-Aliasing technology is always difficult. The difficulty here is not only in algorithms, but also because the visual quality of the image depends on the displaying equipment. Anti-Aliasing images look differently on CRT monitors and on LCD ones. In general it's a science (or maybe even art) called Color Management. Anti-Grain Geometry uses the approach of Anti-Aliasing that potentially allows us to obtain the best result. The rendering procedure calculates the exact coverage values for every boundary pixel and as a result one can have any number of Anti-Aliasing levels. Anti-Grain Geometry uses 256 levels which is quite enough for any practical purpose and much better than 5-level Anti-Aliasing used in many applications, for example, True-Type font renderers, almost all Adobe products and so on. I was absolutely sure that the rendering method I use gives the best result. But when I tried to render the same image with Anti-Grain Geometry and Adobe SVG Viewer I found out that the Adobe SVG Viewer uses only 5 levels of Anti-Aliasing, but the result sometimes looks better than in Anti-Grain Geometry.


The left image is rendered with Anti-Grain Geometry, the right one with the Adobe SVG Viewer.

The lion's moustache look smoother when rendering with 5-level Adobe SVG Viewer, al least on CRT monitors. But still, the enlarged images show us the lack of the Anti-Aliasing levels used in Adobe Viewer.


Obviously, Anti-Grain Geometry can render better, but using a simple linear dependance Pixel Coverage Brightness is not the best and should be corrected. In color management it's called Gamma Correction. For gamma correction I use a simple array of 256 values that give the desired value of brightness depending on the pixel coverage. If all the values in the array are equal to their index, i.e., 0,1,2,3,4,… it means that there's no gamma correction. 
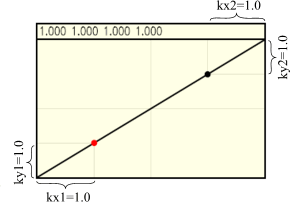
The array can be calculated using any approach, but the simplest method is to use a B-Spline curve with two reference points and four coeffitiens (kx1, ky1, kx2, ky2) that determine its shape. So, I created an application with a special gamma correction control that allows for calculation of the array of the gamma values. 
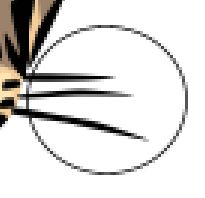
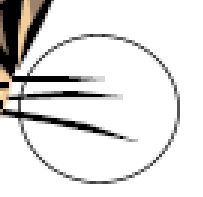
It draws 6 very narrow ellipses, 6 circles and some other figures that can be used as a visual test of the quality of Anti-Aliasing.


Default Shape - No Gamma Correction

The control points can be moved inside their quadrants. The following image looks much better at least on CRT monitors.


Gamma Correction for CRT Monitors

We actually can obtain much better result of certain thickness and brightness, but it cannot be used for general case. The shown above example is a kind of an average case which is not the best for certain parameters, but gives us rather a good average result on CRT monitors, as well as on LCD ones. Below are the examples of other shapes of the gamma curve.


Test Gamma 1

Test Gamma 2

Test Gamma 3

Besides, the gamma correction strongly depends on the content of the image. The values that are good enough for rendering ellipses like shown above may give a very bad result when rendering small text glyphs. The latest require sharper forms, while large geometric figures look better with very smooth edges.

Finally, this is the result of rendering the same lion with gamma correction for CRT monitors. Now it looks better than the one rendered with Adobe SVG Viewer.


You can download the working application for Windows: Gamma Control  (gamma_ctrl.zip)

The source code can be found in the examples directory of the distribution package. Visit the Download page.

Copyright © 2002-2006 Maxim Shemanarev
Web Design and Programming Maxim Shemanarev